For Earth day I thought it would be fun to make some reusable bags from old tees since I can't seem to throw anything away. Hoarder? Possibly. I found this super duper easy tutorial on Martha Stewart that shows you how to make them. They were soooo easy to make. If you can sew a relatively straight stitch, then you can definitely make these!!!
I even made one from one of M's old t shirts that is too small and too stained to donate or give away. She loves that she has one too.
Of course we had to take them out for a spin. Maribel used hers at the beach to hold her select beach toys. She kept asking me if she could get it dirty or wet and because they wash like any old tee it didn't matter what she did with it. She liked that answer.
I used mine at the grocery store. The cashier and bagging associate loved them and kept asking about them and how to make them etc. After quick instructions I overheard, "What a great use for all those old t shirts I have." Cool! Now I feel all close to Mother Earth and green and stuff which reminds me, I forgot to pick up some granola, ah nuts...
On another note...
Tomorrow I am beginning my journey of documenting our everyday life for the Week In The Life with Ali Edwards. I did it a couple of years ago and really enjoyed the journey. It can be viewed here. Last year I only managed to snap a few photos so I never did finish creating the album. This year I have my album all set up and the journal pages printed so all that I have to do this week is be snap happy and have fun.Yay!
There's nothing like having a plethora of pictures to get my scrap mojo going. I just hope I remember my camera tomorrow morning since I have a tendency to forget little things like that...
Showing posts with label altered clothing. Show all posts
Showing posts with label altered clothing. Show all posts
Sunday, April 22, 2012
Tuesday, April 17, 2012
superhero t-shirt cape
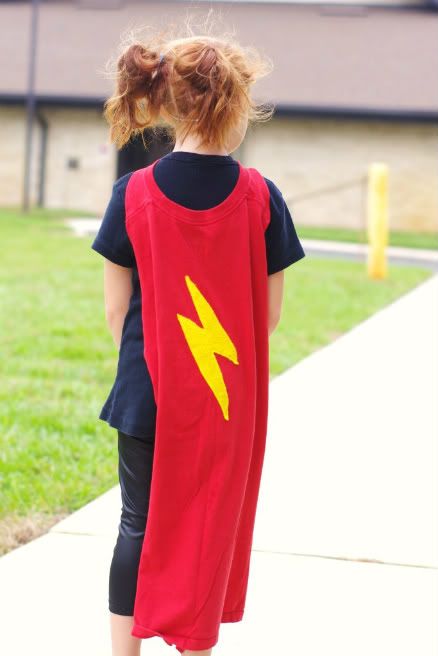
For the Superhero activity the kids were instructed to come dressed as their favourite superhero. Maribel doesn't have any superhero dress up stuff so I went web surfing and found this uber easy tutorial on how to make a super cape from an old t-shirt. If you don't have a sewing machine don't worry, this one is no sewing necessary.
I already had tee that I picked up from a thrift store months ago and all I had to do was snip and sew on the lightning bolt and mask. I also hemmed the edges for a cleaner look but it's not necessary. You don't have to but my snipping skills (or lack there of) were showing and I wanted clean edges.
When she was asked which superhero she was she would tell them that she was Superman and Supergirl's kid.
The mask I just used a leftover Pin The Bow On Hello Kitty blindfold from her birthday party (that we forgot to play-oops) as the template and just sewed the two pieces of felt together. But I cut out the eyes of the top colour first becuase I wanted the bottom colour to show through. I reused the elastic from the blindfold since it was already measured out. Hey, it's just one less step.
This is her trying to smile after crying. I guess this super girl's weakness is shrub thorns. Poor thing, her legs got all scratched up playing in the bushes or the "woods" as she calls it but still had a smile for me...well, sort of. Okay, now I just want to go and give her another hug...and poke her dimple. ^.^
I can't help but recall the line from The Incredibles where Edna says, "No capes. Do you remember Thunderhead?"
I also created a movie for this activity. You can check it out here if you haven't seen it yet. It was a high budget film *sniff* totally.
Tuesday, August 3, 2010
it's a bird, it's a plane, it's...
...SuperMom!!!
Growing up I was conviced that my mom had special powers or something because she always knew what I was up to when I was little. I even asked her one day while we were at a resturant how many fingers I was holding (under the table) and when she guessed right I was amazed and hence forth convinced. I think when we become mothers ourselves we get those 'powers' the moment things go quiet. It's super.
To make your own SuperMom shirt here's what you will need:
I found these shirts at Charlotte Rouse for $3 ea so I bought several doubles of different colours. The thrift store is another great place for cheap jersey knit. I wish I thought of that earlier...oh well. Moving on. Click on the logo image and save it then print it on reg paper using the 8x10 page layout setting. You do not have to print in colour to save on ink. Black and white will do just fine.
Pin and trace around the logo design making sure that the design is centered on the main shirt. Repeat this step on background knit.
Cut out the outline from the background knit and pin to the other shirt. Sew around the edging and the pattern design.
Cut out several long strips approximately 1 1/2" to 2" wide from the other contrasting colour. (Ribbon could work too) Because I'm using a t shirt I plan on altering, I just used one side of the shirt to make the strips. Good thing I gave up wanting to be a surgeon. Yikes. I see now that a rotary cutter and guide is top on my "To Buy" list. Sew a few strips together to make one long strip. And repeat with the other strips for a total of two long strips.
To make ruffles stitch along one side with the largest stitch setting on your sewing machine. Pull one thread to gather the fabric. Be careful not to tug too hard or the thread will snap. Tie a knot with the threads on both ends to prevent the ruffles from coming undone. Experience is speaking on this one. Don't worry about running out of ruffle strips. If you do, just make more ruffle strips and overlap them to hide any gaps.
Once you have your pretty ruffle strips, start pinning one along the outline of the design and sew a straight stitch in the center to secure pulling the pins out as you go. Repeat with the other long ruffly strip for the inside 'S'. Snip the loose threads and any extra ruffle and enjoy your new shirt.
Now you can go and conquer the household chores and investigate the silence with your SuperMom skills. ;o)
By the way, in case you ever need to know how to clean up an entire bottle of Baby Powder dumped over carpet and tile, do not use the vacuum what ever you do. It only goes right through the filter and back into the air. Instead, sweep up as much as possible first and then mop up the rest. The nice part is everything will smell so fresh and clean for a few days. Even the cat...
>^..^<
Tuesday, June 22, 2010
a little tee reconstruction
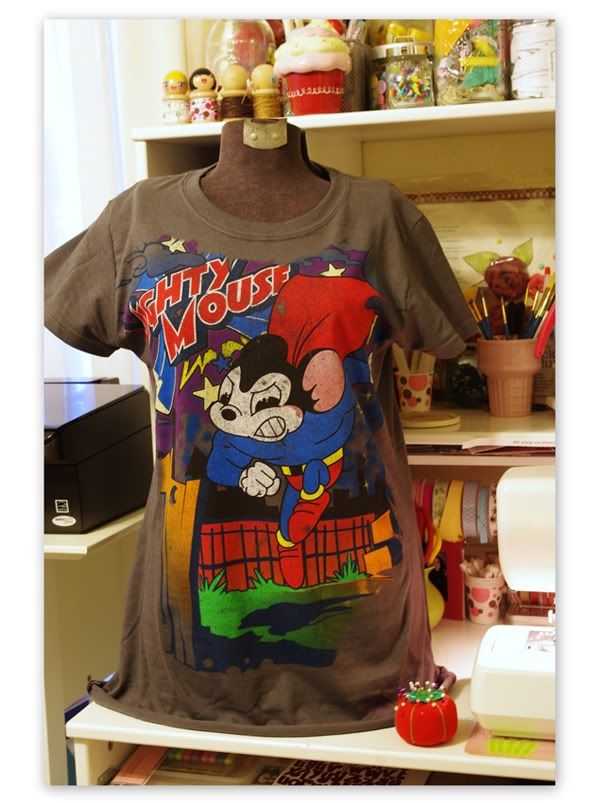
Target was having a wicked sale on graphic tees this weekend and I saw one that I had to have. The only bummer part was that it was 3x’s too big. Nuts. But right as I was about to walk away I thought, “There’s gotta be a way to make it work!” so into my cart it went. :oP
When I got home I slapped in a Wallace and Grommit movie for M baby and went straight to work.
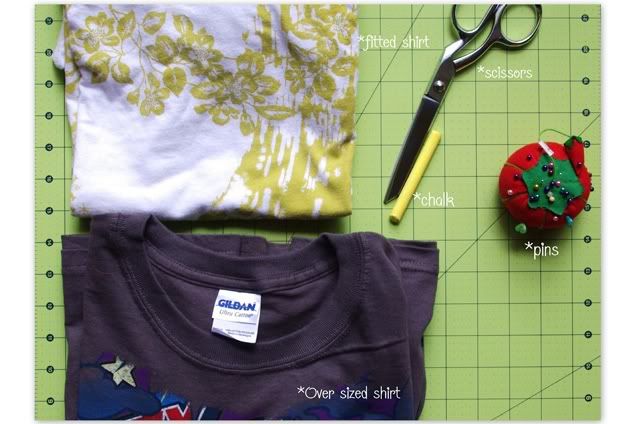
Here’s what you need to resize an oversized shirt. I forgot to photograph the monster sized shirt.Sorry.
Note: make sure that the fitted shirt you use is close to the same material so they stretch the same. Otherwise your new tee will be a little on the snug side. Yes, experience is speaking.
First thing is to lay both shirts flat and centered matching the shoulders smoothing out any wrinkles. Fold the sleeves of the fitted shirt in and trace the outline with a marking pen or chalk. Cut outside the markings for your seam allowance. I gave myself a ¾” seam allowance in this project. Mark the center of the shoulder with either a pin or chalk.
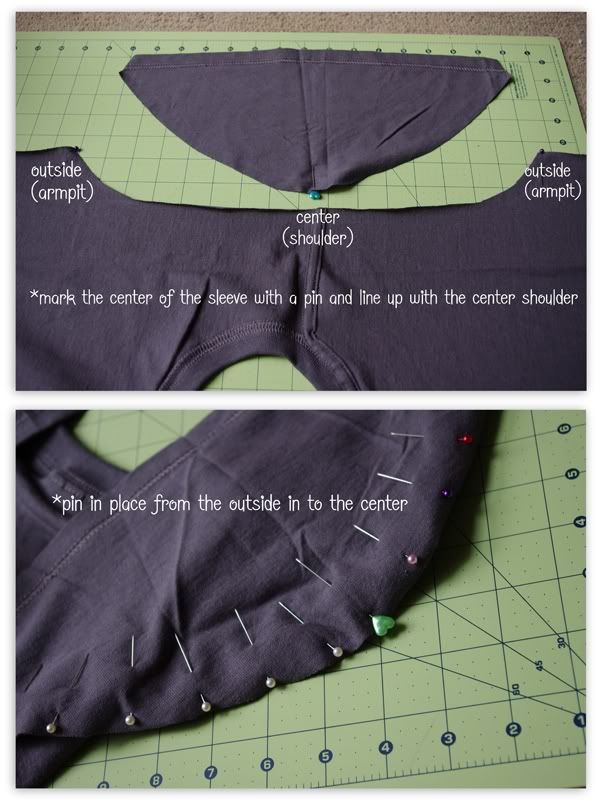
Next part is the sleeves. Take the fitted shirt and the sleeves you just cut off and match up the edge of the sleeves and mark the center of the sleeve. I used my heart pins as my center markings. Trace out the smaller sleeve and cut out leaving a nice seam allowance. Use your freshly cut sleeve as a pattern for the other side.
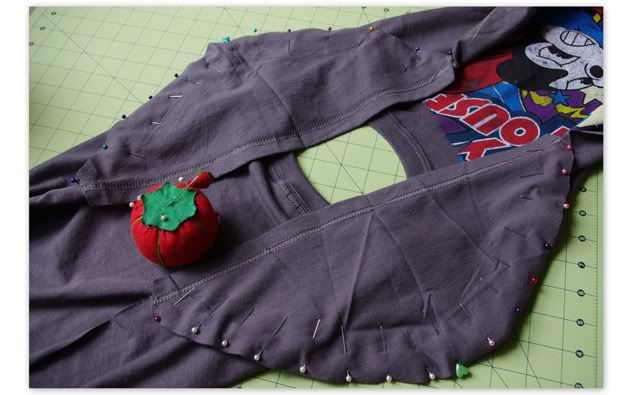
Now comes the pinning and poking. I always poke myself in someway no matter how careful I am. It’s like I’m a magnet or something. Sorry, didn’t mean to go off on a little tangent. Anywho, open up the shirt and line up the center of the sleeve with the center of the shoulder and pin together. Next pin the two ends (outsides) of the sleeve to the armpits of the shirt with the right sides together and continue to pin together from the outside in towards the center. Make sure you don’t stretch your fabric or it will come out a little distorted. Again, experience is talking.
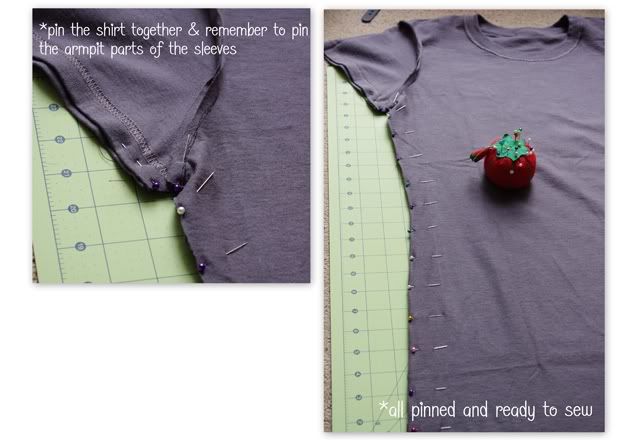
Back to the pinning and poking. Turn the shirt inside out matching the right sides together and pin the sides all the way down. Remember to pin the short under part of the sleeves for the armpits. Hee Hee What a funny word, armpit. Sorry. I’m tired, can you tell? Anywho, head back to the sewing room and sew up the sides removing the pins as you go. Turn right side out and admire your new shirt!
I like my shirts long so I left the length as it was but now would be the time to trim and hem the bottom to your liking. Slap on your new shirt and rock on or fight crime. Whatever.
I have a goal. It's a shrinking goal if you will. ;0) I realize that I will need to cut back on some *cough* *coughunhealthycough* habits so this will save me a few bucks as I go through the metamorphosis into the skinny, beautiful me that is hiding inside there. Somewhere.
Happy Sewing!!! Ooo a piece of candy!
>^..^<
When I got home I slapped in a Wallace and Grommit movie for M baby and went straight to work.
Here’s what you need to resize an oversized shirt. I forgot to photograph the monster sized shirt.Sorry.
Note: make sure that the fitted shirt you use is close to the same material so they stretch the same. Otherwise your new tee will be a little on the snug side. Yes, experience is speaking.
First thing is to lay both shirts flat and centered matching the shoulders smoothing out any wrinkles. Fold the sleeves of the fitted shirt in and trace the outline with a marking pen or chalk. Cut outside the markings for your seam allowance. I gave myself a ¾” seam allowance in this project. Mark the center of the shoulder with either a pin or chalk.
Next part is the sleeves. Take the fitted shirt and the sleeves you just cut off and match up the edge of the sleeves and mark the center of the sleeve. I used my heart pins as my center markings. Trace out the smaller sleeve and cut out leaving a nice seam allowance. Use your freshly cut sleeve as a pattern for the other side.
Now comes the pinning and poking. I always poke myself in someway no matter how careful I am. It’s like I’m a magnet or something. Sorry, didn’t mean to go off on a little tangent. Anywho, open up the shirt and line up the center of the sleeve with the center of the shoulder and pin together. Next pin the two ends (outsides) of the sleeve to the armpits of the shirt with the right sides together and continue to pin together from the outside in towards the center. Make sure you don’t stretch your fabric or it will come out a little distorted. Again, experience is talking.
We are getting there!
Now off to the sewing room!!!
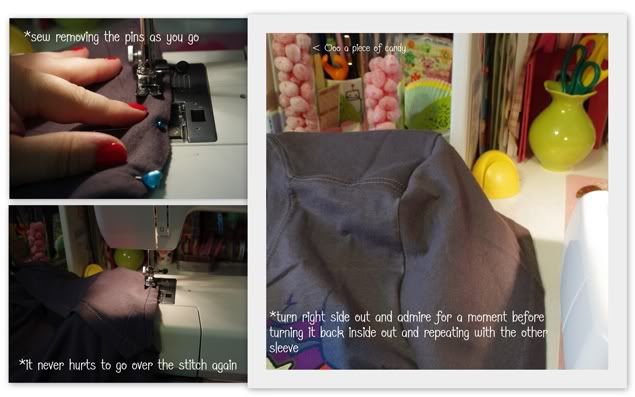
Sew the sleeves removing the pins as you go from one side of the armpit to the other. Back stitch your first and final stitches. I like to go over the freshly sewn seam for that added support. Make sure you don’t sew your shirt together. That’s coming up next and don’t forget to repeat with the other sleeve. Back to the pinning and poking. Turn the shirt inside out matching the right sides together and pin the sides all the way down. Remember to pin the short under part of the sleeves for the armpits. Hee Hee What a funny word, armpit. Sorry. I’m tired, can you tell? Anywho, head back to the sewing room and sew up the sides removing the pins as you go. Turn right side out and admire your new shirt!
I like my shirts long so I left the length as it was but now would be the time to trim and hem the bottom to your liking. Slap on your new shirt and rock on or fight crime. Whatever.
I have a goal. It's a shrinking goal if you will. ;0) I realize that I will need to cut back on some *cough* *coughunhealthycough* habits so this will save me a few bucks as I go through the metamorphosis into the skinny, beautiful me that is hiding inside there. Somewhere.
Happy Sewing!!! Ooo a piece of candy!
>^..^<
Subscribe to:
Posts (Atom)

