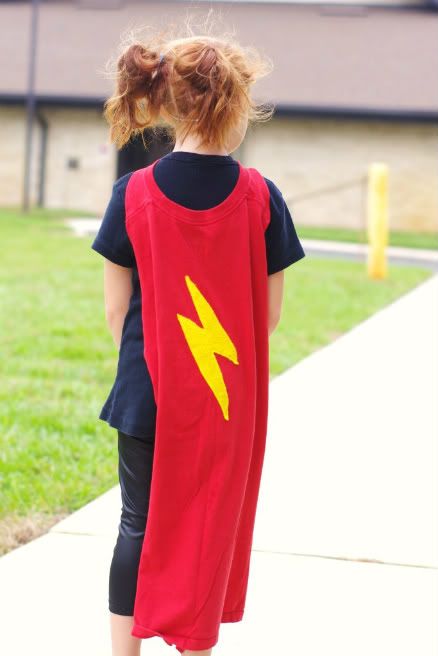
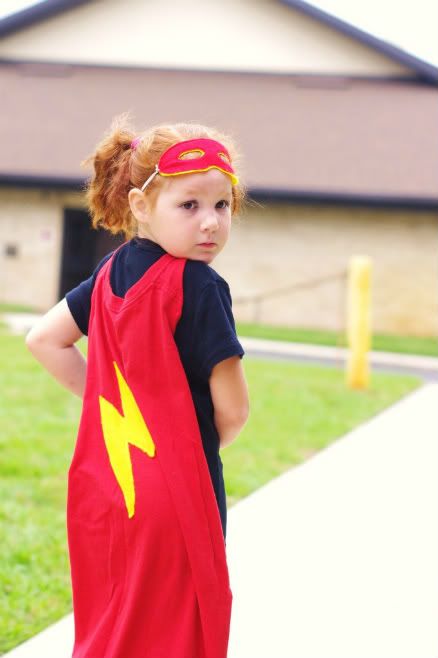
For the Superhero activity the kids were instructed to come dressed as their favourite superhero. Maribel doesn't have any superhero dress up stuff so I went web surfing and found this uber easy tutorial on how to make a super cape from an old t-shirt. If you don't have a sewing machine don't worry, this one is no sewing necessary.
I already had tee that I picked up from a thrift store months ago and all I had to do was snip and sew on the lightning bolt and mask. I also hemmed the edges for a cleaner look but it's not necessary. You don't have to but my snipping skills (or lack there of) were showing and I wanted clean edges.
When she was asked which superhero she was she would tell them that she was Superman and Supergirl's kid.
The mask I just used a leftover Pin The Bow On Hello Kitty blindfold from her birthday party (that we forgot to play-oops) as the template and just sewed the two pieces of felt together. But I cut out the eyes of the top colour first becuase I wanted the bottom colour to show through. I reused the elastic from the blindfold since it was already measured out. Hey, it's just one less step.
This is her trying to smile after crying. I guess this super girl's weakness is shrub thorns. Poor thing, her legs got all scratched up playing in the bushes or the "woods" as she calls it but still had a smile for me...well, sort of. Okay, now I just want to go and give her another hug...and poke her dimple. ^.^
I can't help but recall the line from The Incredibles where Edna says, "No capes. Do you remember Thunderhead?"
I also created a movie for this activity. You can check it out here if you haven't seen it yet. It was a high budget film *sniff* totally.
Showing posts with label sewing. Show all posts
Showing posts with label sewing. Show all posts
Tuesday, April 17, 2012
Thursday, August 18, 2011
finally a cupcake I can eat
A while back I joined this online workshop site called Something Splendid where you can take virtual classes and make all kinds of fun crafty things. I've taken a few and so far my favorite class has been creating these delightful felt treats. Maribel's tea parties have now turned into cupcake parties, she loves them so much and so do I for that matter since not only are they super cute but they are calorie free!
These are the ones that you get make in the class (minus the pink swirled frosting with a strawberry top since that one is lost somewhere in the void which is M's room.) My favorite are the cherries and strawberries which make the perfect cupcake toppings. Don't they look delicious? They are so easy and addictive to make that I couldn't wait to make more...
Meet Mr and Mrs C.Mr C likes fun hats and to talk all debonair like while stroking his stache. He's been caught flexing his sugar sweet muscles in the mirror when he thinks his sweet 'ems isn't looking, but she's always looking. He has a soft spot for puppies and plans to surprise his Mrs with one this Christmas. Shh don't tell the Mrs.
Mrs C loves anything pink and is always laughing at the silly things Mr C says. She also loves to bake sweet treats for her sweet cheeks sweetheart and dance while doing house work to maintain her cylinder figure. She hopes to visit Paris with her Sugar Daddy and shop the many bakeries.
and as you can see they are madly in love.
>^..^<
These are the ones that you get make in the class (minus the pink swirled frosting with a strawberry top since that one is lost somewhere in the void which is M's room.) My favorite are the cherries and strawberries which make the perfect cupcake toppings. Don't they look delicious? They are so easy and addictive to make that I couldn't wait to make more...
Meet Mr and Mrs C.
Mrs C loves anything pink and is always laughing at the silly things Mr C says. She also loves to bake sweet treats for her sweet cheeks sweetheart and dance while doing house work to maintain her cylinder figure. She hopes to visit Paris with her Sugar Daddy and shop the many bakeries.
and as you can see they are madly in love.
>^..^<
Tuesday, June 22, 2010
a little tee reconstruction
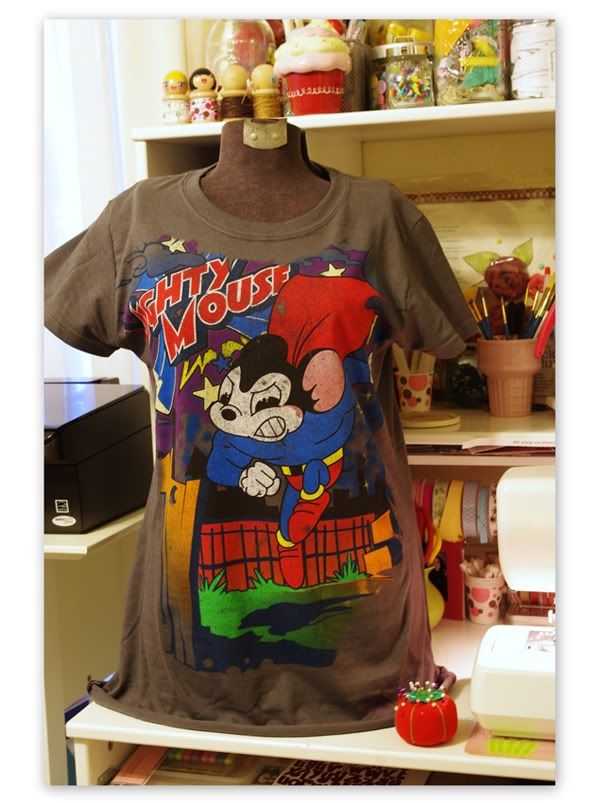
Target was having a wicked sale on graphic tees this weekend and I saw one that I had to have. The only bummer part was that it was 3x’s too big. Nuts. But right as I was about to walk away I thought, “There’s gotta be a way to make it work!” so into my cart it went. :oP
When I got home I slapped in a Wallace and Grommit movie for M baby and went straight to work.
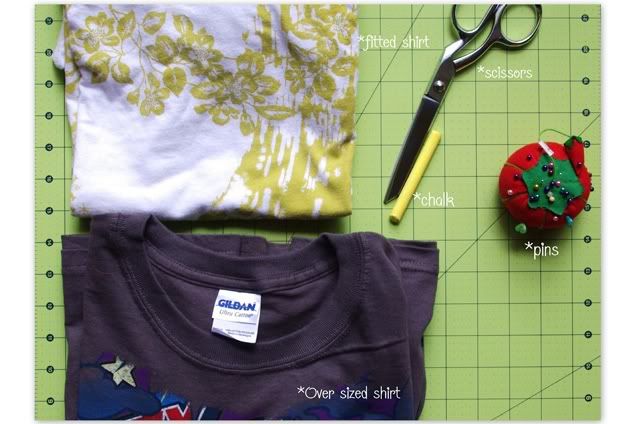
Here’s what you need to resize an oversized shirt. I forgot to photograph the monster sized shirt.Sorry.
Note: make sure that the fitted shirt you use is close to the same material so they stretch the same. Otherwise your new tee will be a little on the snug side. Yes, experience is speaking.
First thing is to lay both shirts flat and centered matching the shoulders smoothing out any wrinkles. Fold the sleeves of the fitted shirt in and trace the outline with a marking pen or chalk. Cut outside the markings for your seam allowance. I gave myself a ¾” seam allowance in this project. Mark the center of the shoulder with either a pin or chalk.
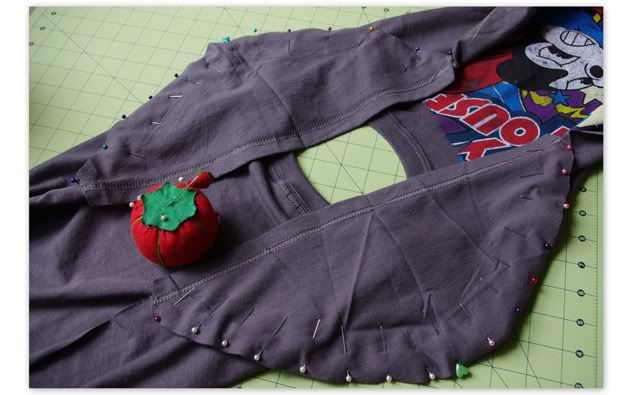
Next part is the sleeves. Take the fitted shirt and the sleeves you just cut off and match up the edge of the sleeves and mark the center of the sleeve. I used my heart pins as my center markings. Trace out the smaller sleeve and cut out leaving a nice seam allowance. Use your freshly cut sleeve as a pattern for the other side.
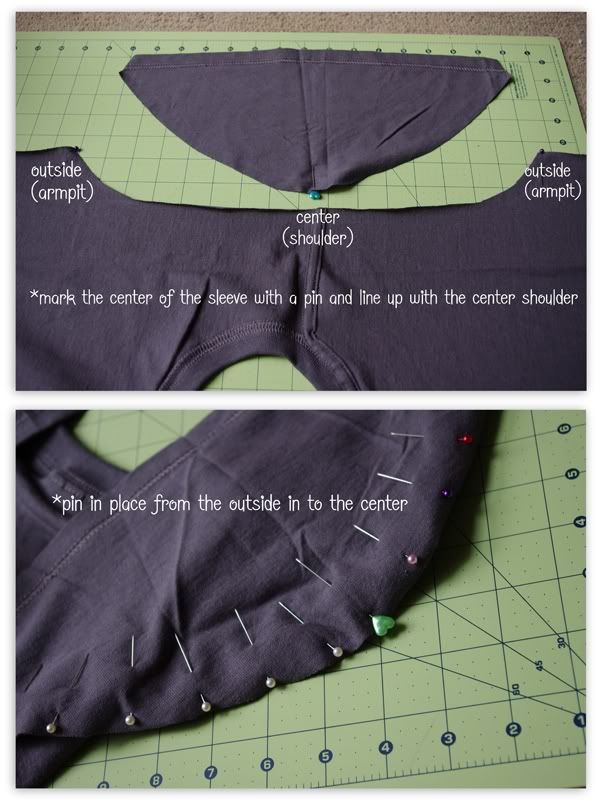
Now comes the pinning and poking. I always poke myself in someway no matter how careful I am. It’s like I’m a magnet or something. Sorry, didn’t mean to go off on a little tangent. Anywho, open up the shirt and line up the center of the sleeve with the center of the shoulder and pin together. Next pin the two ends (outsides) of the sleeve to the armpits of the shirt with the right sides together and continue to pin together from the outside in towards the center. Make sure you don’t stretch your fabric or it will come out a little distorted. Again, experience is talking.
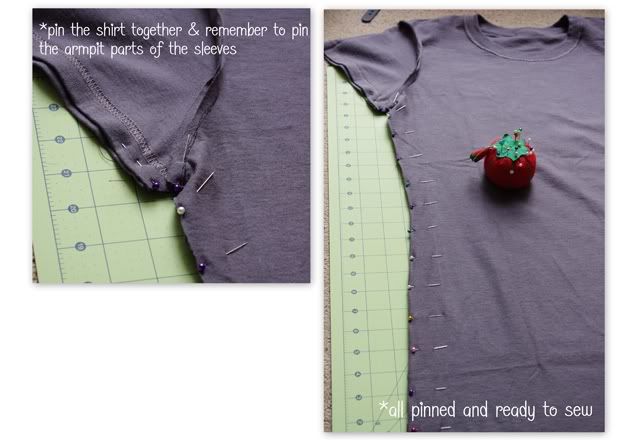
Back to the pinning and poking. Turn the shirt inside out matching the right sides together and pin the sides all the way down. Remember to pin the short under part of the sleeves for the armpits. Hee Hee What a funny word, armpit. Sorry. I’m tired, can you tell? Anywho, head back to the sewing room and sew up the sides removing the pins as you go. Turn right side out and admire your new shirt!
I like my shirts long so I left the length as it was but now would be the time to trim and hem the bottom to your liking. Slap on your new shirt and rock on or fight crime. Whatever.
I have a goal. It's a shrinking goal if you will. ;0) I realize that I will need to cut back on some *cough* *coughunhealthycough* habits so this will save me a few bucks as I go through the metamorphosis into the skinny, beautiful me that is hiding inside there. Somewhere.
Happy Sewing!!! Ooo a piece of candy!
>^..^<
When I got home I slapped in a Wallace and Grommit movie for M baby and went straight to work.
Here’s what you need to resize an oversized shirt. I forgot to photograph the monster sized shirt.Sorry.
Note: make sure that the fitted shirt you use is close to the same material so they stretch the same. Otherwise your new tee will be a little on the snug side. Yes, experience is speaking.
First thing is to lay both shirts flat and centered matching the shoulders smoothing out any wrinkles. Fold the sleeves of the fitted shirt in and trace the outline with a marking pen or chalk. Cut outside the markings for your seam allowance. I gave myself a ¾” seam allowance in this project. Mark the center of the shoulder with either a pin or chalk.
Next part is the sleeves. Take the fitted shirt and the sleeves you just cut off and match up the edge of the sleeves and mark the center of the sleeve. I used my heart pins as my center markings. Trace out the smaller sleeve and cut out leaving a nice seam allowance. Use your freshly cut sleeve as a pattern for the other side.
Now comes the pinning and poking. I always poke myself in someway no matter how careful I am. It’s like I’m a magnet or something. Sorry, didn’t mean to go off on a little tangent. Anywho, open up the shirt and line up the center of the sleeve with the center of the shoulder and pin together. Next pin the two ends (outsides) of the sleeve to the armpits of the shirt with the right sides together and continue to pin together from the outside in towards the center. Make sure you don’t stretch your fabric or it will come out a little distorted. Again, experience is talking.
We are getting there!
Now off to the sewing room!!!
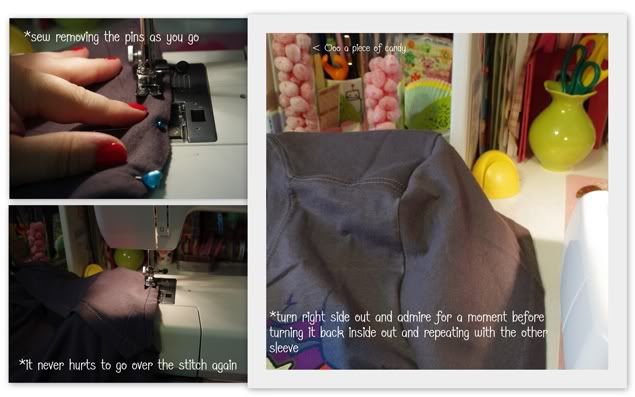
Sew the sleeves removing the pins as you go from one side of the armpit to the other. Back stitch your first and final stitches. I like to go over the freshly sewn seam for that added support. Make sure you don’t sew your shirt together. That’s coming up next and don’t forget to repeat with the other sleeve. Back to the pinning and poking. Turn the shirt inside out matching the right sides together and pin the sides all the way down. Remember to pin the short under part of the sleeves for the armpits. Hee Hee What a funny word, armpit. Sorry. I’m tired, can you tell? Anywho, head back to the sewing room and sew up the sides removing the pins as you go. Turn right side out and admire your new shirt!
I like my shirts long so I left the length as it was but now would be the time to trim and hem the bottom to your liking. Slap on your new shirt and rock on or fight crime. Whatever.
I have a goal. It's a shrinking goal if you will. ;0) I realize that I will need to cut back on some *cough* *coughunhealthycough* habits so this will save me a few bucks as I go through the metamorphosis into the skinny, beautiful me that is hiding inside there. Somewhere.
Happy Sewing!!! Ooo a piece of candy!
>^..^<
Tuesday, March 23, 2010
for pleasure and necessity
This weekend I cracked out my sewing machine and sewed pieces of cloth together! *gasp* I know!
This is the second time in 3 years since I sewed something other then paper and oh did it feel good. I swear at times I could hear my mother's spirit behind me saying, "Now THAT is what I bought your machine for!"
When I was about 12 my mother shared with me something that has been passed down to her from her mother which then came from her mother's mother etc. etc. etc.
If you marry a rich man, you can sew for pleasure
If you marry a poor man, you can sew for necessity
And like my mother, and her mother's mother etc. etc. etc. I have sewn for both.
And you know what? I wouldn't have it any other way.
I wonder if that explains why I can't walk by cute fabric with out having a slice for myself? yeah....that's it heehee
Living so far from my family I wanted to make M something special that she could have that would keep our family close when we are so far. In this book Stitched In Time by Alicia Paulson, I found this great little project that fit perfectly in what I was looking for.
Honestly it only took me an hour and $6.58 to make (the fabric paper was the bulk of the cost.) and I used scrap felt I had laying around. The author of the book also posted the instructions here but the whole book is adorable, trust me-I have my looooong list of projects I plan on creating.
"Diss is Papa, he in Canana. And 'dat's Aidan and Sherry, 'dey in Canana too. And 'dat's Milo, he's a boy. Want to pet him?"
I can't help but love watching her play her little game and telling me everyone's names. It also makes me a bit homesick though, but I think I'll manage. For now.....
>^..^<
Thursday, January 21, 2010
custom photo sleeve
While putting my pages into albums I found I had some photos left over then I had printed but never scrapped. I didn't want to put them away in a box to "maybe" use at a later time, only to get lost. So I thought I would incorporate them into my scrap album too. Sure you could buy some already made but what's the fun in that? Plus I havn't found any that hold both a 5x7 photos and 3x4 on the same sheet, so... ha!
Materials:
-sewing machine***
-12x12 page protectors
-white board pen
-damp paper towel (for wiping off the wb pen ink)
-craft knife
-12x12 thick cardstock or chipboard insert either in white or light in colour
-cutting mat
-ruler
-embellishments of all sorts (optional)
***Note: If you do not have a sewing machine you can use a paper piercer and poke holes along the sew line and use embroidery floss and hand sew along your sew lines creating a unique look. Items needed for hand sewing are:
-paper piercer
-mouse pad or protective mat
-embroidery floss or yarn
-needle for sewing the embroidery floss or yarn
*Insert your white cardstock into the page protector (you can add another sheet or card board so you don’t cut through both sides of the page protector)
Step 2:
*using your white board pen and a ruler, measure and draw your sewing lines (You can use photos of that size as a template to ensure that they will fit after)
Note: If you are not using a sewing machine please skip to Step 6
Note: Steps 6 thru 10 are if you don’t have a sewing machine or would like a different look
I really hope you enjoy making these and making them as unique and beautiful as you are ;0) I would love to see yours, please include a link to your sleeves so I can leave some love!
Here's what you'll need to get started...
Estimated Time for 1-12x12 sleeve 30mins
Materials:
-sewing machine***
-12x12 page protectors
-white board pen
-damp paper towel (for wiping off the wb pen ink)
-craft knife
-12x12 thick cardstock or chipboard insert either in white or light in colour
-cutting mat
-ruler
-embellishments of all sorts (optional)
***Note: If you do not have a sewing machine you can use a paper piercer and poke holes along the sew line and use embroidery floss and hand sew along your sew lines creating a unique look. Items needed for hand sewing are:
-paper piercer
-mouse pad or protective mat
-embroidery floss or yarn
-needle for sewing the embroidery floss or yarn
*Insert your white cardstock into the page protector (you can add another sheet or card board so you don’t cut through both sides of the page protector)
Step 2:
*using your white board pen and a ruler, measure and draw your sewing lines (You can use photos of that size as a template to ensure that they will fit after)
Note: If you are not using a sewing machine please skip to Step 6
Step 3:
*now take your craft knife and ruler to make your horizontal line cuts slightly below your sew line about 1/8”. Be careful not to rub off your newly drawn sew lines ;0)
Step 4:
*Remove the card stock from the sleeve
*Now it’s time to sew! I like to sew the horizontal lines first to prevent it from sliding around thus creating uneven lines and pockets. Then sew the vertical lines, wipe off the white board pen and you are finished!
Add your photos and memorabilia and enjoy your custom made page protector=) For this one I wanted to dress it up a little bit so I added the ribbon after it was all sewn but I was also careful not to sew over the opening to add pictures.
Step 6:
*using your paper piercer or sharp needle, poke holes along your sewing lines making sure you are going through both sides of the page protector. Remember to poke the holes over your mouse pad or cutting mat or your work surface would have been freshly irrigated
Step 7:
*same as Step 3Step 8:
*remove the card stock from your sleeve
Step 9:
*thread your needle with embroidery floss or yarn of your desire and begin to sew through the poked holes.
Step 10:
*Wipe off the white board pen, add your photos and memorabilia and enjoy your custom made page protector=)
If you would like photos of how to do the hand sewing for this project, just leave a comment and I will be more then happy to comply =)
I really hope you enjoy making these and making them as unique and beautiful as you are ;0) I would love to see yours, please include a link to your sleeves so I can leave some love!
>^..^<
Friday, October 16, 2009
wild thing
 This is the finished project that I gave a sneak peek of last week. It was surprisingly easy and very inexpensive to make. I also made one for my sister, but as a hoodie 'cause that's more her thing ;0)
I've been waiting to see this movie ever since I saw the first preview. I really hope Maribel doesn't get too scared, but she looks so cute as a Wild Thing heehee
Have an awesome weekend! Now go and be a little wild.
We are!
j

You can make a hat of your own here. I didn't want the wire to poke Maribel so I used yarn instead and chained 20 and tied off.
Or to make it into a hoodie like the one I made for my sis, I just cut two slits into the hood and followed the directions for the ears for the hat and made the whiskers with whisker material (same used on plush toys) instead of wire and reinforced them with a few stitches so they won't pull out in the wash.
enjoy =)
Subscribe to:
Posts (Atom)

