Showing posts with label Being Crafty. Show all posts

Tuesday, May 7, 2013

project life box

I'm trying not to think about how behind I am on my project life but I made this box to hold all the collected goodies that I have so far. I used the Maggie Holmes Product Sampler available at Scrappy Boutique to decorate the box.


 This particular box came with these thick chipboard dividers so I covered them and used some of the awesome trims and trinkets that come in the kit to decorate them. I left two of them blank to add to later once I figure what else I want to store in there. Any suggestions?


The keepsake section is a place that holds the little souvenirs I pick up along my daily travels. Finally I have a place to keep these little odds and ends to add into my pages. As it sits right now I throw them into a zip lock baggie but then I lose the bag so this section is most handy to me. It's a darn tootin' good thing that my head is attached or I'd lose that as well. Trust me....
My favourite thing to make for Project Life is handmade ATC's from leftover scraps. These are all 3x4 cards that can either be filler cards or hold photos/journaling. I've participated in a few project life tag swaps on Instagram and that's what got me hooked on making these little gems. Super easy and duper fun!

I've also created some scrappy pages with this kit so I will share those next. Don't want to overload the server now....Take care and ta ta for now. *wink

Monday, March 25, 2013

anchors aweigh -an itty mini album tutorial

I read somewhere that anchors are the next up and coming trend which reminds me of the little itty mini album I created for Scrappy Boutique using the Uncharted Waters Product Sampler kit. I absolutely love this kit. The extras are super fun and the papers were so easy to work with. If you want to see all the comes in the kit just check out their video of all of the contents.  
Now let's go make a mini album shall we?
First thing’s first is gathering your supplies.
            -album cover paper cut to 5 ½ x 12
            -3 papers cut to 5 x 7
            -embellishments of choice
            -adhesive of choice
            -scissors
            -bone folder (or a ruler works just as well)
            -score pad (or paper trimmer used for scoring)
           - sewing machine (don't worry if you don't have one, I'll show an alternative as well)

Next is to fold the 5x7 paper in half and set aside for a moment. Then score the 5 1/2 x 12 cover paper at 2 1/2", 6 1/4", 6 1/2" and again at 10 1/4" then fold on the score lines.
For the larger front pocket snip the corner off and then glue the bottom edge of the front pocket and the top and bottom edge of the back pocket.
Now off to the sewing machine we go.  
Assemble the 5x7 papers in the order you want and line them adding the Glassine baggie (if you are using the Product Sampler kit) and then sewing down the middle. 
If you do not have a sewing machine you can also hole punch the center and use ribbon to bind it together. Now that your album is all assembled it's time to add your personal touch with embellishments of your choice. 

I was afraid of my keepsakes falling out of the little baggie so I punched out two small flowers and used brads to attach them for the twine to wrap around. 

It’s itty and it’s mini but it can hold quite a bit. I hope you had fun making this little itty and please post a link in the comments to your creations so we all can see and oogle and ahhh over them.

Tuesday, April 17, 2012

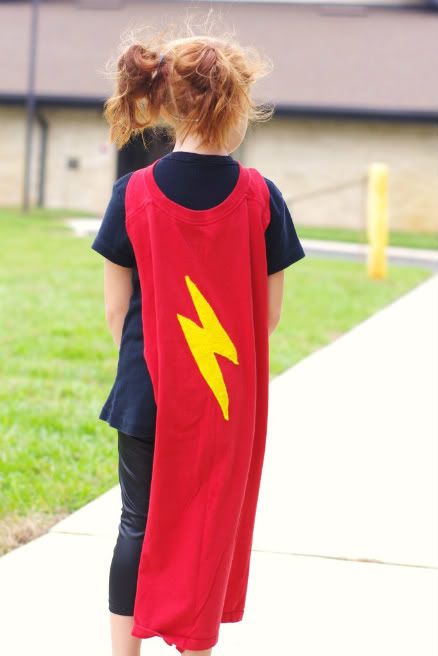
superhero t-shirt cape

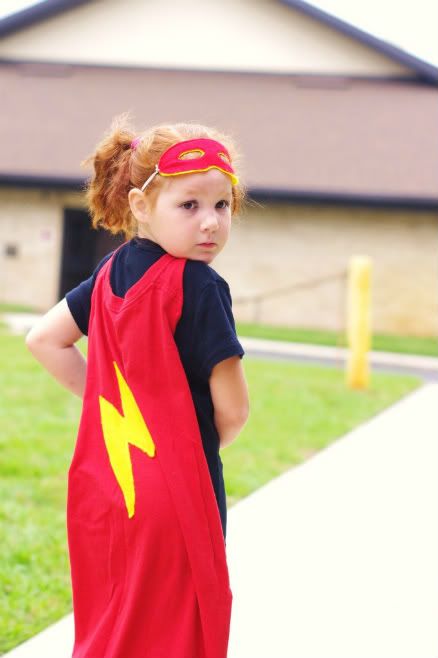
For the Superhero activity the kids were instructed to come dressed as their favourite superhero. Maribel doesn't have any superhero dress up stuff so I went web surfing and found this uber easy tutorial on how to make a super cape from an old t-shirt. If you don't have a sewing machine don't worry, this one is no sewing necessary.
I already had tee that I picked up from a thrift store months ago and all I had to do was snip and sew on the lightning bolt and mask. I also hemmed the edges for a cleaner look but it's not necessary. You don't have to but my snipping skills (or lack there of) were showing and I wanted clean edges.

When she was asked which superhero she was she would tell them that she was Superman and Supergirl's kid.
The mask I just used a leftover Pin The Bow On Hello Kitty blindfold from her birthday party (that we forgot to play-oops) as the template and just sewed the two pieces of felt together. But I cut out the eyes of the top colour first becuase I wanted the bottom colour to show through. I reused the elastic from the blindfold since it was already measured out. Hey, it's just one less step.
This is her trying to smile after crying. I guess this super girl's weakness is shrub thorns. Poor thing, her legs got all scratched up playing in the bushes or the "woods" as she calls it but still had a smile for me...well, sort of. Okay, now I just want to go and give her another hug...and poke her dimple. ^.^
I can't help but recall the line from The Incredibles where Edna says, "No capes. Do you remember Thunderhead?"

I also created a movie for this activity. You can check it out here if you haven't seen it yet. It was a high budget film *sniff* totally.

Tuesday, March 20, 2012

the tooth fairy door

In a blink of an eye it inevitable happened. My freshly five year old lost her other baby tooth (one of the ones she was born with-yes she was born with two teeth) and is growing up. *sniff*
When I heard the great news I knew that the Tooth Fairy would be expected later that evening so I quickly made a Tooth Fairy door so that she wouldn't have to break and enter to make the transaction. Instead she would use her "fairy magic" and come in through the special door.
Pipa keeping a watch out.
Maribel was so excited and actually went to bed on time with no hastle or extra requests. But she did keep checking the door to see if the Tooth Fairy had used her magic to open the "magic portal."
Nothing yet. It didn't take long before she was fast asleep dreaming about cupcakes and fairy dust.
When she woke she was beyond excited about her $2 and when she went back to check the door to see if the  magic portal had been left open she found that the portal had been closed...but evidence remained....
"Mommy, Mommy! The Tooth Fairy left some fairy magic in the door." as she starts rubbing all over her hands. At least Milo is safe. For now.......

Thursday, August 18, 2011

finally a cupcake I can eat

A while back I joined this online workshop site called Something Splendid where you can take virtual classes and make all kinds of fun crafty things. I've taken a few and so far my favorite class has been creating these delightful felt treats. Maribel's tea parties have now turned into cupcake parties, she loves them so much and so do I for that matter since not only are they super cute but they are calorie free!
These are the ones that you get make in the class (minus the pink swirled frosting with a strawberry top since that one is lost somewhere in the void which is M's room.) My favorite are the cherries and strawberries which make the perfect cupcake toppings. Don't they look delicious? They are so easy and addictive to make that I couldn't wait to make more...

Meet Mr and Mrs C.
Mr C likes fun hats and to talk all debonair like while stroking his stache. He's been caught flexing his sugar sweet muscles in the mirror when he thinks his sweet 'ems isn't looking, but she's always looking. He has a soft spot for puppies and plans to surprise his Mrs with one this Christmas. Shh don't tell the Mrs.
Mrs C loves anything pink and is always laughing at the silly things Mr C says. She also loves to bake sweet treats for her sweet cheeks sweetheart and dance while doing house work to maintain her cylinder figure. She hopes to visit Paris with her Sugar Daddy and shop the many bakeries.

and as you can see they are madly in love.

>^..^<

Wednesday, July 27, 2011

zooble run


I saw this neat idea in a Family Fun magazine where they used empty paper towel tubes and toilet paper tubes to create a marble run that would stick to the fridge with magnets. Since I had some leftover empty rolls from another project (which I will post later ;o) I thought this would be fun to use for Missy Pant's Zooble collection. We gathered up some supplies and had a little painting party and 30 messy minutes later......Voila!
Our very own Zooble Run!

The Zoobles are heavier than marbles and the track wouldn't stay up using the sticky backed magnet strips like the instructions suggested so we improvised until I can figure out a better way to make them stay up on the fridge. Meh, it works but I am open for suggestions.

I think the best part of this project was painting the tubes. Maribel likes the splatter and smear technique where I like to paint polka dots or self portraits like the one here...*wink*

Now every time Maribel sees an empty roll waiting for someone to change to a new one she instructs both Joe and I to keep them so we can add to the Zooble run. What ever works to keep her from glittering the cats and getting into stuff even if it's only for a half an hour. Hey, I'll take what I can get.

>^..^<

Sunday, April 3, 2011

diy easter lace up cards

Easter is coming and I am so happy it's spring. Although living in Florida we don't really get spring per se but more like "Oh no it's below 65F this must be winter" to the "well...the calendar says it's 'spring' but really 85F is SUMMER but since all the stores look like the Easter Bunny threw up, I'll go with spring. So bring on the pastels and a legitimate excuse to purchase chocolate. woot woot  
So while I was nibbling on some delightful Cadbury chocolate egg and doing a little surfing I came across these cool Vintage Easter prints and thought they would make a fun inexpensive little project.  Lace up Easter cards. So quick and simple that it won't cut into the sweet chocolate nibbling time.
After saving a couple photos you just print them on the same page onto white cardstock and set it aside for a little time to dry. After the images are dry cut them out and punch out the holes and your done.
Ta da!
The best part is that the sound of the printer covers up the sound that the tinfoil makes whilst unwrapping a little choco-treat and when you walk out with a cool little project that looks like you slaved hours on they won't know any different. Go ahead and say it, it's ingenious. I know.....I know.

Have I ever mentioned that I'm a great enabler? It's true. I'll help justify anything all you need do is just say the word.

>^..^<

Sunday, February 20, 2011

kitchen board

I've been in need of some organization and something that would keep my scattered thoughts together in a central place since lately all my spare time has been planning M's upcoming birthday bash and preparing for  my cousin coming down to escape the white stuff. It's amazing I haven't gone to work in my pyjamas or something redonkulous as that. Yup, I just said, redonkulous. Aye ya yi.

So as inspired by a previous post I "rescued" a larger frame that Joe bought to hold photos of me when we were dating. I know, right? Aww. So with his "blessing" to repurpose the frame for better suited function, here is my new kitchen board.

As you can see there's lots of variety of items that usually require a separate list. There's a spot for a menu for a week, a place to note when so & so calls, a To Do list, grocery list, a calendar, and a blank spot for other noteworthy thoughts. At least I think my thoughts are noteworthy...

I was getting a little tired of trying to come up with dinner after my tiresome drive home from work so I'm hoping this will assist with after-work-brainmush that seems to happen when I get home. Also now Joe has no excuse for not having something to write on when someone calls. I have lost count on the number of times he tells me "Oh and by the way, somebody called for you." Me, "Who?" Him, "I dunno, someone. I think it was a chick." He tries and that's what counts.
Here's a closeup on the always depleting, never replenished grocery list. I bought this pad from Anthropologie awhile back and since I'm always forgetting something I need this list really helps. I also thought this would be a good way to always know what I need. When I run out just check it off as I go. I see a few things right now that I will need to pick up....soon.

And since I had to change the batteries in my favourite cat clock, I decided to keep it in the kitchen instead of my scraproom. Maribel likes how his tail moves back and forth but the rats cats keep staring at it like they think it's going to steal their food or something. I can see why since it's sitting above their food station at least until I can find another kitchen clock I like but I might take my time looking. I kinda like it there...

So....Maribel is turning 4 this week. I'm not freaking out or anything....*booooooiiiiip* Great. There went my Pinocchio nose.

supplies: old frame; acrylic paint; chipboard and shape stickers: October Afternoon; Papers: October Afternoon, MME; Thickers; Basic Grey Alpha stickers; All Out Of-Anthropologie; Making Memories notepad; Calendar: Creative Cafe.

>^..^<

Wednesday, February 9, 2011

tic tac toe

And now the project:

As promised here is the project that developed from the Hugs and Ki**'s layout. At first I was satisfied with just a scrapbook page but then the more I looked at the photos the more I was inspired to make a custom tic tac toe game the whole family can enjoy on game night.

Here's what you'll need to make one of your own:
  • 2-6x12in piece of chip board or a cereal box (I used Tim Holtz grungeboard found at Michaels-remember to use a coupon)
  • 6-2x2in photos cropped to fit 4x6 photo printed twice (for a total of 12 little photos)
  • 1-12x12in sheet of pretty paper
  • acrylic paint in the colour of your choice
  • paper trimmer
  • scissors
  • modge podge 
  • 2-sponge applicators (one for painting and one for the modge podge)
  • don't forget your lovely smile ;-)

The first thing is to cut the chipboard (not "chopboard" lol) into12- 2x21/4 inch squares. Then trim the photos into 1/8 inch smaller then 2x2 inch squares and set aside. This will give a nice little border which makes it easy when sealing it with the modge podge later.
I had our Stinky Winky help me with this part as she loves to paint everything when given the chance. :D Just paint one side of the chipboard squares and set aside to dry. As you can see you won't need to paint the entire square as your photo will cover most of it.
**Unless your name is Maribel, which then you just can't help yourself and MUST paint the entire square, and fingers, and table, and anything else that needs a little colour.**
While the paint is drying cut your pretty paper the same size of the chipboard in the same amount. This will be the backside of the playing pieces.
Alrighty so the paint should be dry now so you get to get all sticky with the modge podge. Start with glueing the pretty paper squares to the backside of the chipboard pieces, then flip them over and glue the photos to the painted side. Once you have everything all glued together just run a smooth coat of modge podge over the front and back giving ample time to dry on each and there you have it! Your custom tic tac toe game.
As for the game board you can use anything to make the grid. Ribbon, chalk, chopsticks, regular sticks, etc. I like to use the chalkboard cookie sheet that a friend inspired me to try sometime back. It works great.

Maribel sort of gets the object of the game but ends up playing it her own way. She's always "X" while we have to play the "O" but that's okay, X's are kisses and she gives the best little kisses.
xoxo

>^..^<

Saturday, February 5, 2011

a frame of mind

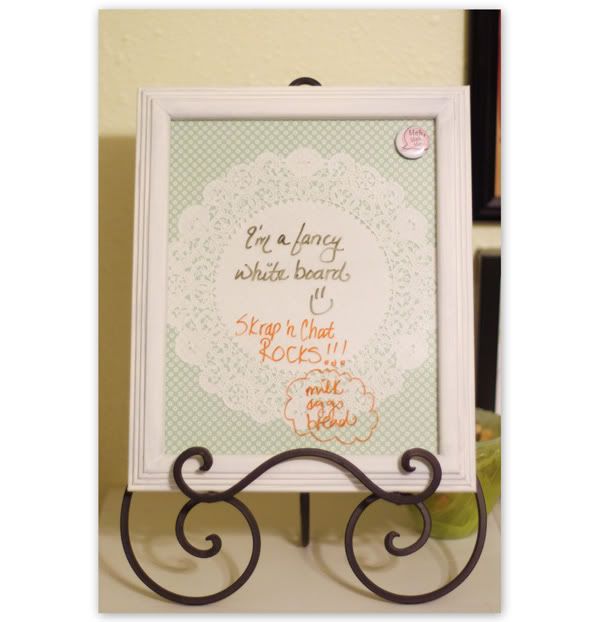
I shared this tutorial at Skrap 'n Chat during our 2nd birthday crop last weekend and was so delighted to see so many beautiful frames come from it that I just had to share here too. :D
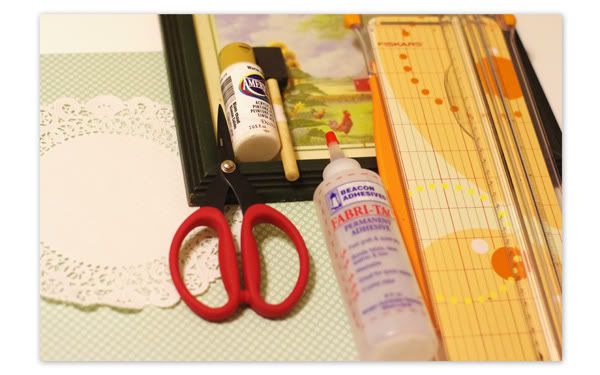
Here's what you'll need...
  • an old frame with the glass
  • acrylic paint and brush (optional if you like your frame as is)
  • scissors
  • paper trimmer
  • glue
  • pretty paper
  • any flat embellishments like rub ons, flowers, anything that will fit under the glass with relative ease (I used a paper doily for simplicity)
  • ruler (not pictured-oops)
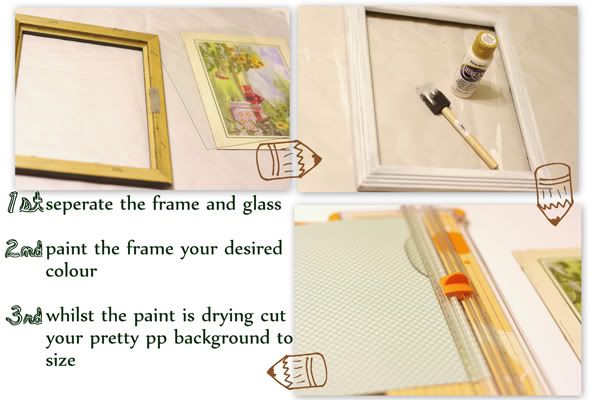
First thing you will want to do is remove the glass and backing from the frame and paint. Mine took two coats because of the dark wood and made sure to let it dry completely before adding the additional coat.

After the paint is dry and the background paper is cut, decorate and embellish to your heart's content. I kept mine simple because I really liked the October Afternoon paper. Simple yet elegant.
Put the frame back together and voila!
Now you have a fancy new dry erase board to keep track of all those thoughts and notes. My memory is a sieve so I take all the help I can get as my youth has begun to catch up with me. I have to say, though, it is very satisfying to use materials already on hand and also very rewarding.

This particular one is on it's way to a new home. Where it's going I cannot say....but it's cold there. ;o)

>^..^<