Tuesday, August 31, 2010

Dear Lizzy passport cover

With all the excitement of finally getting my passport approved, I wanted a little cover for it for some added protection from the purse gremlins. Since I leave is just a short time eep! I looked in many stores and couldn't find any I liked and online would  have taken too long. So what else is there to do then break out the craft supplies and take matters into my own hands. Plus it's more fun this way, and cheaper ;o)

Here's what you'll need:
Not shown:
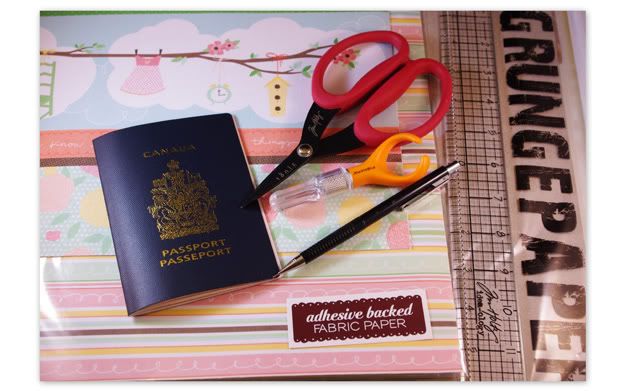
sewing machine with matching thread
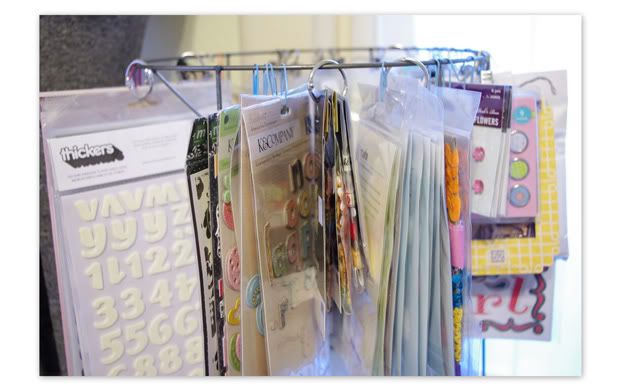
embellishments if desired

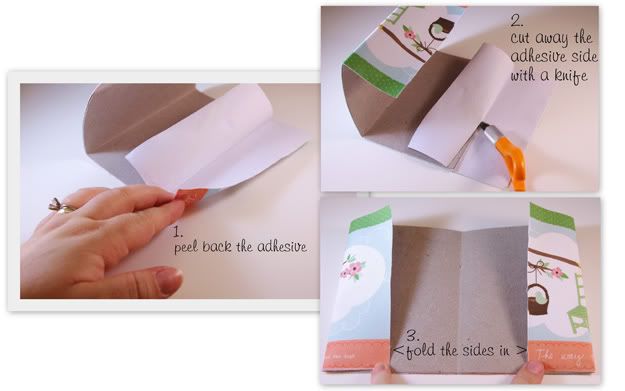
Note: If you don't  have access to Grunge Paper or Fabric Paper do not worry. You can replace the grunge paper with chipboard or an old cereal box and use some scrap fabric and spray adhesive to make it stick to the chipboard to replace the Fabric Paper.
Okay, to start you will want to lay your passport open and mark the height and length on the chipboard giving a seam allowance on the edges. Cut out and fold in half. I like to fold it with the passport inside because the passport is a little thick and it's pages might over extend on the sides. My measurements are 5 1/4" x 7 6/16". Don't be afraid to adjust the measurements to your needs/desire.
Next is to use the chipboard as a guide and measure your fabric to the same height and add approximately 2 inches to either side for the inner flaps and cut out. My measurements are 5 1/4" x 11 1/4". Fold in half again in the center folding with the passport and the chipboard to get even coverage. Peel back the adhesive and place the chipboard matching the center fold lines.
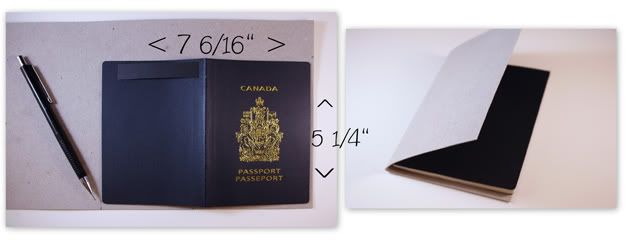
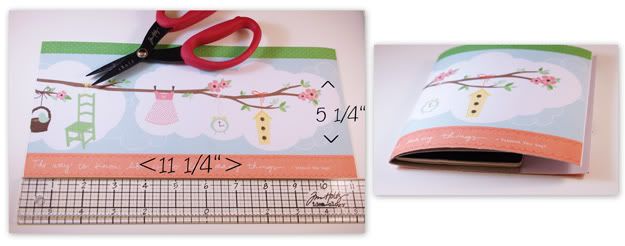
You can use your ruler or a bone folder to press the chipboard and sticky back together for added pressure. (If you do not have adhesive backed fabric, you would spray the backside of the chipboard and stick the fabric to the chipboard and let dry for the amount recommended on the spray adhesive instructions)

Now with the Dear Lizzy fabric paper you can peel away the sticky back from the fabric leaving just the fabric. Do this on either sides until you reach the chipboard edges. Then use an exacter or scissors and carefully slice/cut away the peeled adhesive leaving the fabric flap.
It's sewing time :D
Sew along the top and bottom of the cover back stitching the beginning and end stitches and you are done :o)
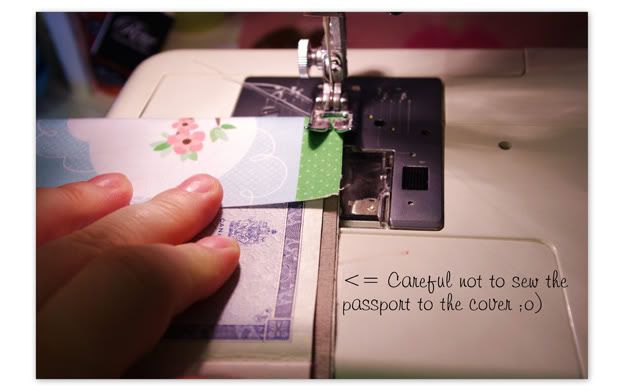
VERY IMPORTANT: Sew as close to the edge as you can otherwise there won't be enough room for the passport flaps to fit inside. Yes, experience is talking here.

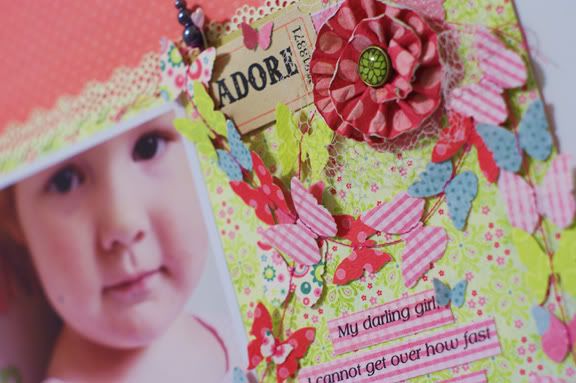
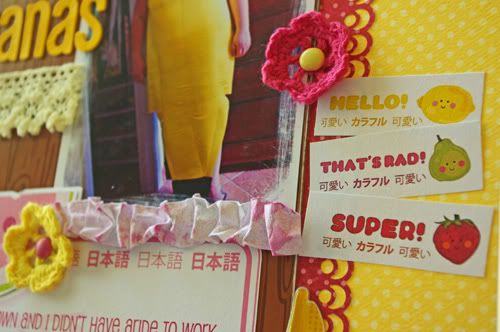
You can embellish if you would like or you can leave it as is. On the striped one I thought it could use a little something extra so I made some rolled rosettes with some leftover fabric strips and glued them to the cover and the other I added a little flower on the sweet little branch. Just enough to give it something extra yet simple.

I made two but really only need one so leave me a comment about where you would like to travel and I will draw a random winner on Saturday for the striped one with the rosettes.

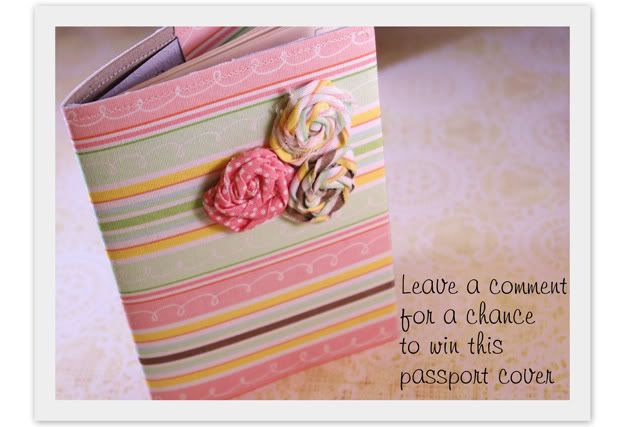
I hope you enjoy making your custom passport cover.

I'm linking this project here. Check it out for some awesome inspiration :D

>^..^<

Sunday, August 29, 2010

a nice wake up call

I woke up this morning to Mr. Milo giving me love bites. It's also his way to drop the hint that he wants to be petted. Nice.

Then Maribel comes waltzing in to wake me up by resting her little face centimeters from mine. So much for snoozing in. Double nice. 

Then Joe comes in and tells me that we had a phone call this morning and he agreed that I would give the opening prayer in sacrament. Aww so nice.

I love Sunday mornings.

>^..^<

Thursday, August 26, 2010

beach keepsake frame

Just before we left for the long drive home from our beach vacay last month, I made sure to grab a bag of sand from the beach. I loved that all I had to do was walk out the back door and scoop, scoop, scoop. *sigh* I miss that luxury. Anyways, moving on...

I really wanted to make a keepsake of our wonderful time at the Wrightsville Beach, NC so I used some of the sand and filled a shadow box to the photo line and added some of the shells we collected from our many beach excursions. I glued around the bottom edging of the box to ensure that the sand will not sift through and kept it upright the whole time. Sorry I don't  have any photos of the process, it was really late when inspiration struck me. So once I had as many shells as I wanted, I added the back board and hung it up in my office cube. It's pretty heavy so I used extra hooks to be safe.


I love that I have a keepsake from our little holiday and when work gets a little rough I can just look over and take a mini vacation to the little piece of sandy heaven. Ahhhh I can hear the ocean now.

I still have a couple creative ideas in mind for home, like displaying the rest of the sand in an apothecary jar with some shells mixed in and use that as a bookend. Ooo or maybe even scrap with it. Now that sounds like fun ;0)

>^..^<

Monday, August 23, 2010

love is like a flutterby

When I was a little girl my mom used play Dolly Parton's "Love is Like a Butterfly" and I would sing "Love is like a Flutterby".  For as long as I can remember I have had a special love for butterflies and I'm pretty sure it's because of this song. 

Maribel and I always blow each other kisses and pretend they are fluttering through the air and we catch them and place them on our hearts. It's one of the many things we do when we say good bye or good night. We're quirky like that ;o) She is so loving and sweet it makes my heart skip a beat. And so do pretty pink and blue butterflies punched from pretty paper sitting on my sewing machine. Seriously, in love.
To make the butterfly garland punch out a multitude of butterflies and start stitching on the first one and continue to feed them through one at a time. For the gap just put the pedal to the metal and let the feed catch the next butterfly. Add as many as you would like until you run out of butterflies or have the garland as long as you desire.

Wouldn't they be pretty as a mobile? I think that is next on my pretty project list. Something like this would be super cute in a little girls room or your own haven.
eep 18 more sleeps!!!

>^..^< 

Saturday, August 21, 2010

slow and steady wins the race

I had my weekly meeting today and I thought since I haven't updated in a while I better get on that so you don't think I'm welshing' on my commitment. I assure you I am measuring, writing down (when I get the first chance), and making better choices (or so I thought-Perkins isn't kind to ye 'ole "healthier lifestyle"). *sigh*

I have continued to set weekly goals for myself to stay motivated. Sometimes I meet them. Sometimes not. But the effort is there. This week I went to the meeting with pretty low hopes.

-2.6lbs
Wholy Toledo! Who knew?!?

I thought for sure I gained. I mean when I look at everything, I've been sick this past week and Mother Nature is standing outside my window holding her perfectly packaged gift for me. Wench. Plus my Perkins excursion turned out to be way more disastrous than I had originally thought/planned. I had a slice of their sugar-free Wildberry Pie which ended up being 9 points. Of course that was after my 21 point Island Tilapia dinner. I ate the bun too. *tear* I wrote every bite down in my little book. I noticed then I hadn't use any flex points until then but I sure made up for it that evening. What a surprise.
I guess marking the boxes really does make a difference and I have cut my soda's down a significant amount. That's gotta count for something right? Ooo and I got some Activity in too. Who knew that unloading a semi truck full of Dell computers counts towards Activity? Love it!
I guess now that explains why I was able to purchase a pair of jeans the next size down and they fit!!! I thought I was going to have to save them for later. Nopers. I'm wearing them right now. They are the ones in the top photo. ;0)

Here's to another successful week! I Hope your journey is a grand one too!
Shtats:
Day 7 of Week 5:
Weekly Goal: Drink 6 servings of water a day for at least 5 days {check}

Mini Weight Goal: Lose 11lbs
Lbs Lost: -8.2
Lbs left to mini goal: 2.8lbs heck ya!!!

>^..^<

Friday, August 20, 2010

a little shady

This idea came from one of our lovely's at SkrapnChat. She shared her lampshade embellishment holder and not even 24 hours later I made mine. What a brilliant idea! You can use paper clips to hang everything or binder clips for those loose items that don't have any packaging. I found binder rings are great for grouping certain embellies together. I had some 7Gypsies clips on hand and used those. Perfecto!!
When she shared that hers was from an old plastic lampshade from the thrift store I knew exactly what she had because I had one of the same shades. Only mine didn't come from the thrift store. I had one already. I know. It was given to us. But now it serves a usefull purpose then being an eyesore.

I don't have a before photo of the shade because I was just so excited to use it for something else and I generally crop it out of pictures. It was that bad. But this was the conversation between Joe and I when he saw me standing by the turtle tank assessing the unglyness of the plastic lampshade...

Joe: What are you doing?
Me: Nothing. Just looking at this ugly plastic lampshade.
Joe: Why?
Me: Oh to see if it will work for something that I want to make.
Joe: You know that lamp is over 40 years old right?
Me: Ya, I'm sure it was just as ugly back then as it is now. So I am going to make something of it and get a prettier lampshade for the lamp.
(All the while I'm sticking my hand and arm in and out of the plastic wraps of the shade.)
Joe: Stop that please.
Me totally knowing what he means but I'm a stinker and keep doing it anyways: Stop what?
Joe: Sticking your arm through that like that. It's disturbing.
( I unscrew the shade off and start ripping off the old yellowed with age tape and begin the unravelling)
Joe: What are you doing?!?
Me: Taking off the plastic.
Joe: Can you please do that somewhere else. This is really disturbing me.
Me: Why?
Joe: I don't go around tearing up your grandma's stuff.
Me: My grandma didn't have plastic lampshades.

I walked away and finished unravelling and began hanging my embellishments that were laying around.

This didn't even dent what I have stashed here and there in my scrap room. I love that I can see my Thickers  and the best part is they don't drag on the table, it's the perfect height.

Total cost for this project $0.00
Cost for the Clip It Up that was saved in my Wish List $46.79
Total savings $46.79

I'm thinking another one might be in the works before the weekend is thru.

>^..^<

Tuesday, August 17, 2010

oh brother,

wherefore art thou?

What do you do when you open your eyes to this? I have never seen someone so excited about a thrift store find then my very own Mojo Jojo and these um....overalls. I couldn't stop giggling every time he showed me all the "features" they came with. 

Well, at least Halloween is covered this year...all that's missing now is the straw hat and piece of wheat from the corner of his mouth. *sigh*
Gotta love him.

>^..^<

Sunday, August 15, 2010

tea for two

When Daddy is away at work, us girls get to play and dress up and hold very elite tea parties with the toy boxes finest. And do a little shopping too. But that's for later. heehee

We call it "Tea Time" but since Maribel doesn't really like any of the herbal teas I have, we used water instead. Easy clean up. I guess it doesn't really matter what you drink as long as you are in good company. Teddy and Rainbow Bright were invited to this wonderful afternoon get-together although they didn't have much to say.
Along with the water the bunny grahms were the snack favourite. Formal dress was also required with beautiful lady hats but then we couldn't see each other so we ditched them.
I can't think of anything I would rather be doing right now other then this. 
I so *heart* Saturdays with my boo.

This layout was created using a sketch from Pencillines which was also the sketch of the month over at Skrap n' Chat .

>^..^<

Friday, August 13, 2010

I love the rain but...

...not when I have plans.


I have high hopes to go to ye ole' Disney World tomorrow but lookin' at all these drops still falling from the sky with the same forcast for tomorrow I'm thinking a plan B is in order.

At least it's Friday! YaY!!! ...wait, today is Friday the 13th oooOOooo!
Any suggestions on what Plan B should be?

>^..^<

Wednesday, August 11, 2010

a bushel and a peck

Maribel and I sing this song almost everyday. It is our family song. You know how couples always have a special song that they claim as "their song" (yes Joe and I have one of those too) well this is ours. One of my fondest childhood memories is when my dad would sing this song to us girls in the car and so I carry that on in our car rides together.

Even though we are moving soon I still had to hang it up to enjoy. It seems such a shame to make something just to pack it away.

Have a great humpday!!

I came across this idea from a link party here with the original blog posts the "how to" on her blog here. Oh so many ideas so little time...but first I'm calling my dad to tell him how much I love him.

>^..^<

Monday, August 9, 2010

alphabet fun and paper dolls

I think every parent has either owned a set as a child or purchased a set for their children. That's right. I'm talking about those plastic alpha magnet sets that never seem to stay as a complete set. So then you get creative like this:
While I was shopping at Target last weekend I picked up some cute alphabet stickers from their dollar spot. I needed more alphas like I needed a hole in my head but they were cute. So I got them. I think buying alphas is a disease. If not, it should be because I have it and have yet to find the cure. Well, here's what I did with the Target ones since I felt so guilty buying more of what I didn't need.
Just stick them on the magnet sheet, cut them out and enjoy.
That's it. Super duper simple! The best part is if you lose a letter it's no big deal. Just grab a replacement from your other alpha sets and you're back in business. You could totally use those lone alphas that never got put onto pages but yet you still hang on to just in case. You know the ones. Ya, those. I will be adding those to the mix as soon as I get another sheet of the magnet canvas. I bought the last few in the store because I knew I wanted to do something else other then alphabets. Paper Dolls.

Growing up my mother used to buy me those paper dolls that you punched out the clothes and folded the tabs to keep the outfits in place. I loved those so so much. Thinking about them also make me miss my mom something terrible. When I saw these paper dolls created by April Meeker I knew I had to make them for Maribel.
After printing them on some plain card stock, I ran them through my Xyron to make them super sticky and followed the previous steps to the alphabet magnets.
Now I'm wishing I kept those metal cd cases that aOl had mailed out to everyone years ago. Those would make perfect little storage containers for these dolls and it would make them portable too. Ooo maybe a tin lunch box instead? I'm sure I have one of those laying around...
I hope you enjoy this super easy project.
Happy crafting!!

>^..^<

Saturday, August 7, 2010

7 years of fun

Sometimes I get a flash moment that I forget I ever lived somewhere else other then Florida. This usually is followed with an "Oh yeah, that's how I got here." It's so hard to believe that 7 years ago I said "Forever" to my ever stimulating, always keeping me grounded hubby.

To celebrate our anniversary we checked Maribel in with the sitters (Gma's house) and made our way for some nummy sushi. 
You can tell the ones I picked because I'm non adventurous when it comes to sushi. Joe on the other hand  likes to try new things to look all manly and stuff. Whatever. I know the real Joe. The big softy that cries watching chick flicks and blames it on allergies and eyelashes yet won't eat the "pink stuff" until he dares his wife to do it first. It's ginger. I ate most of it just to show him up. That's the fun part of marriage. After all, I have a reputation to keep being married to a guy who has no problem jumping into a pool of poisonous snake and alligator infested water to catch a turtle.
Oh what a life.
And I wouldn't change it for the world.

Here's to many many many many many and many more!

>^..^<

Friday, August 6, 2010

this porridge is too hot, this porridge is too cold...

my new Canadian passport photo
So I am on my third, count them, 1,2,3 3rd attempt to submit my passport application. Man what a pain in the keishter!!!

The first attempt I had majour issues with my photo and one little issue with the Guarantor's information. My photo had too many shadows, skin was uneven in tones, wrong size format, it wasn't dated from the Walgreen's punk that did them, um let's see what else, oh yes, my eyes were not clearly visible. Okay. Fine. My mistake for not reading the fine print for the photo regulations.

The second attempt came back because the online photo company I used that "Guaranteed" the photos to be accepted came back saying the photo was too light and there were flash points on the face. They underlined the flash points. Nice. What a great boost for ye ole' self esteem because I'm naturally a fair, light complexioned person. So much for the Guarantee.

The third attempt: Well I had enough of the game and this time (the 3rd and hopefully the final time) I went to a place in Bradenton Florida that is approved by the Canadian Consulate. I'm crossing my fingers and toes and hairs that this works. I really hope this works this time because I'm all out of options.
So there I have it, $70 poorer but new and fresh passport photos and a sunburn to go with it. The Anna Maria beach was minutes away from the portrait studio so naturally I had to visit. It is my new favourite Florida beach fo sho!

Happy Friday!
Tomorrow Mr C and I are celebrating our 7 years of awesomeness. Bring on the sushi and the quality "alone" time ;0)

>^..^<

Tuesday, August 3, 2010

it's a bird, it's a plane, it's...

...SuperMom!!!

Growing up I was conviced that my mom had special powers or something because she always knew what I was up to when I was little. I even asked her one day while we were at a resturant how many fingers I was holding (under the table) and when she guessed right I was amazed and hence forth convinced. I think when we become mothers ourselves we get those 'powers' the moment things go quiet. It's super.

To make your own SuperMom shirt here's what you will need:
I found these shirts at Charlotte Rouse for $3 ea so I bought several doubles of different colours. The thrift store is another great place for cheap jersey knit. I wish I thought of that earlier...oh well. Moving on.
Click on the logo image and save it then print it on reg paper using the 8x10 page layout setting. You do not have to print in colour to save on ink. Black and white will do just fine.

Pin and trace around the logo design making sure that the design is centered on the main shirt. Repeat this step on background knit.

Cut out the outline from the background knit and pin to the other shirt. Sew around the edging and the pattern design.

Cut out several long strips approximately 1 1/2" to 2" wide from the other contrasting colour. (Ribbon could work too) Because I'm using a t shirt I plan on altering, I just used one side of the shirt to make the strips. Good thing I gave up wanting to be a surgeon. Yikes. I see now that a rotary cutter and guide is top on my "To Buy" list. Sew a few strips together to make one long strip. And repeat with the other strips for a total of two long strips.  
To make ruffles stitch along one side with the largest stitch setting on your sewing machine. Pull one thread to gather the fabric. Be careful not to tug too hard or the thread will snap. Tie a knot with the threads on both ends to prevent the ruffles from coming undone. Experience is speaking on this one. Don't worry about running out of ruffle strips. If you do, just make more ruffle strips and overlap them to hide any gaps.

Once you have your pretty ruffle strips, start pinning one along the outline of the design and sew a straight stitch in the center to secure pulling the pins out as you go. Repeat with the other long ruffly strip for the inside 'S'. Snip the loose threads and any extra ruffle and enjoy your new shirt.

Now you can go and conquer the household chores and investigate the silence with your SuperMom skills. ;o)

By the way, in case you ever need to know how to clean up an entire bottle of Baby Powder dumped over carpet and tile, do not use the vacuum what ever you do. It only goes right through the filter and back into the air. Instead, sweep up as much as possible first and then mop up the rest. The nice part is everything will smell so fresh and clean for a few days. Even the cat...

>^..^<

Monday, August 2, 2010

going bananas

No I haven't lost it and gone bananas. Not yet at least. I just wanted to share my latest layout inspired from this post. How could I not scrapbook that day? hee hee

The super kawaii fruit and word strips are from the digital kit I purchased from here. I couldn't  help but use as many of them as I could with out it looking like Fruit of the Loom threw up on my page. I also made some into magnets for little M. She loves them almost as much as me. Atta girl!!

The wood grain cardboard is from a packaging from a set of alphas I purchased from Target's dollar spot. I'm sure I've already mentioned how much I love Target's dollar deals. Seriously awesome!! Also, I tried a new technique using wet cardstock and shaping it into some pretty ruffles then spritzing some Glimmer Mist for some twinkling shine. I love these ruffles. Like, a lot.

So that's all from the peanut gallery. Stay tuned for an upcoming mini tutorial using leftover alphas. I only wished I thought of it sooner ;0)

Happy Monday!

>^..^<

Sunday, August 1, 2010

you lose some you gain some

or in my case I did a little bit of both.

It wasn't until recently that I realized that I didn't give my first week's update on my weight loss journey. Oops. Vacations tend to bring on the forgetfulness. Especially beach vacations.

Well of course the first week is always a big loss and I was no exception. I lost 4.4 lbs by dutifully adding more fruits and vegetables into my meals and snacks and drinking a considerable amount less soda pop and more 'water'. I can't drink water straight up so I use those single serving mix ins. They really help me get my fluids in for the day. So woohoo for a big loss!

And now on to the 2nd week. dun dun duuuuuuuuuuun
Well you see, here's the thing. I went on a mini vacation to a family reunion at a beach house and everyone took turns cooking the dinners. Not every meal was, shall I say, point watcher friendly. I did my best considering that I forgot my scale and measuring cups at home. Of course. That would have been too much for me to remember them. Really too much. *rolling my eyes* But having said that as soon as we came back home I was back on the plan. Just because I had a few indulgent days doesn't mean I throw in the towel. Not yet. I'm in this though thick and thin.
Hopefully for thin. yuk yuk. *wiping away the tear*

I went to my meeting yesterday and lo and behold the scale said +.6 I wasn't surprised. It's a good thing I'm in it for the long haul or you'd have to stick a fork in me 'cause I would be done.
So bring. It. On.

Today is Day 1 Week 3.

Weekly Goal: Drink 2 servings of milk a day for at least 5 days
Mini Weight Goal: Lose 11lbs
Lbs Lost: -3.8

>^..^<